Let me guess:
You’re trying to figure out what size filter press you need. And you’re drowning in technical specs, calculations, and engineering jargon.
I get it.
Selecting filter press capacity is one of those things that seems simple on paper. Until you actually try to do it.
The good news?
Once you understand the key factors (and avoid the common mistakes), how to select filter press capacity becomes surprisingly straightforward.
In this guide, as a professional filter press manufacturer, I’ll show you exactly how to size a filter press for your specific needs. No fluff. Just actionable steps that work.
Let’s dive in.
Why Filter Press Capacity Matters More Than You Think
Here’s the thing:
Pick a filter press that’s too small? You’ll create a production bottleneck that costs you thousands per day.
Go too big? You’ve just wasted capital on equipment that runs inefficiently. Plus, it takes up valuable floor space.
In fact, a recent industry study found that 67% of facilities operate with incorrectly sized filtration equipment.
That’s a lot of wasted money.
But here’s what most engineers don’t realize:
Filter press capacity isn’t just about handling your current load. It’s about optimizing your entire operation.
When you nail the sizing, you get:
- Maximum throughput with minimal cycles
- Lower operating costs per ton processed
- Better cake dryness (which means easier handling)
- Room for future expansion without major capital investment
Sound good? Let’s look at what actually determines capacity.
The 6 Critical Factors That Determine Filter Press Capacity
Most people think filter press sizing is all about plate size.
Wrong.
(That’s like saying car performance is all about engine size. Sure, it matters. But it’s not the whole story.)
Here are the factors that ACTUALLY determine your filter press capacity:
1. Daily Solids Loading
This is your starting point.
How many tons of dry solids do you need to process per day?
Not wet sludge. Not slurry volume. Dry solids.
Here’s a quick example:
Let’s say you have 1,000 tons of wastewater with 1% solids content.
Your calculation: 1,000 tons × 1% = 10 tons of dry solids per day
Pro tip: Always use your peak loading, not average. I’ve seen too many operations get burned by sizing for average conditions.
2. Slurry Characteristics
Not all sludges are created equal.
A highly compressible biological sludge behaves totally differently than mineral tailings. And that directly impacts your sizing.
Key characteristics to consider:
- Solids concentration (higher concentration = smaller press needed)
- Particle size distribution (affects filtration rate)
- Compressibility (determines optimal pressure)
- Chemical conditioning (can dramatically change filterability)
For example, municipal sludge typically needs 30-50% more filtration area than mineral concentrates at the same solids loading.
3. Cycle Time
This is where things get interesting.
Your total cycle time includes:
- Filling time
- Filtration time
- Cake discharge time
- Cloth washing (if needed)
A typical cycle runs 1-4 hours. But here’s the kicker:
Shorter cycles don’t always mean higher capacity.
Why? Because rushing the filtration phase can leave you with wetter cakes. Which means more handling issues downstream.
I’ve seen operations double their effective capacity just by optimizing cycle time. No new equipment needed.
4. Operating Hours
Simple math here:
If you run 8 hours per day, you need 3x the capacity per cycle compared to a 24-hour operation.
But don’t forget maintenance time.
Even 24/7 operations need downtime. Build in at least 10-15% buffer for:
- Routine maintenance
- Cloth changes
- Unexpected issues
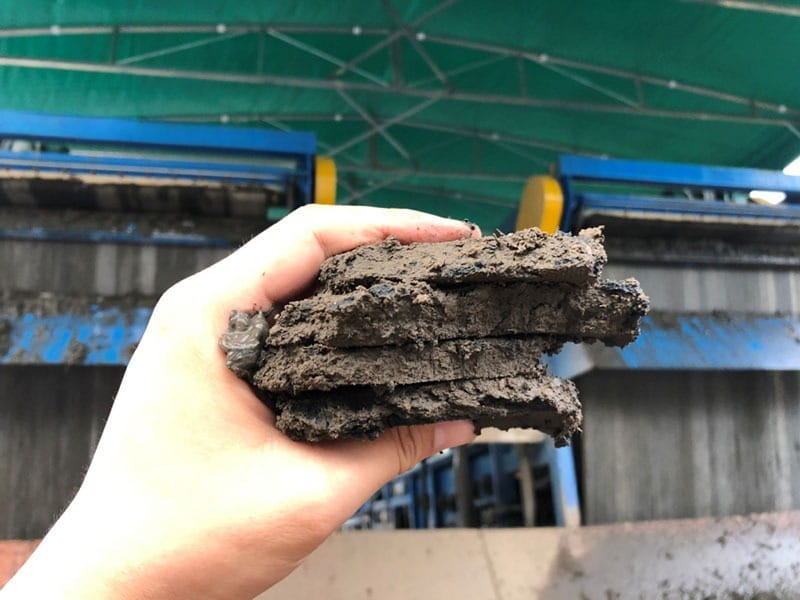
5. Cake Thickness
Standard recessed plates give you a fixed cake thickness (typically 25-32mm).
But if you can use chamber recessed plates or membrane plates, you might achieve 40-50mm cakes.
That’s a 50% capacity increase with the same number of plates.
The catch? Not all materials can form thicker cakes without compromising discharge.
6. Future Expansion
Here’s something most vendors won’t tell you:
Adding capacity later is expensive. Really expensive.
That’s why I recommend sizing for at least 20-30% growth. You can always run fewer cycles now. But when production ramps up, you’ll be ready.
How to Select Filter Press Capacity: Step-by-Step Calculation
Alright, let’s put this all together with a real example.
Scenario: Municipal wastewater treatment plant
- Daily flow: 1,800 gallons of sludge
- Solids content: 8%
- Operating hours: 8 hours per day
- Target moisture: 75%
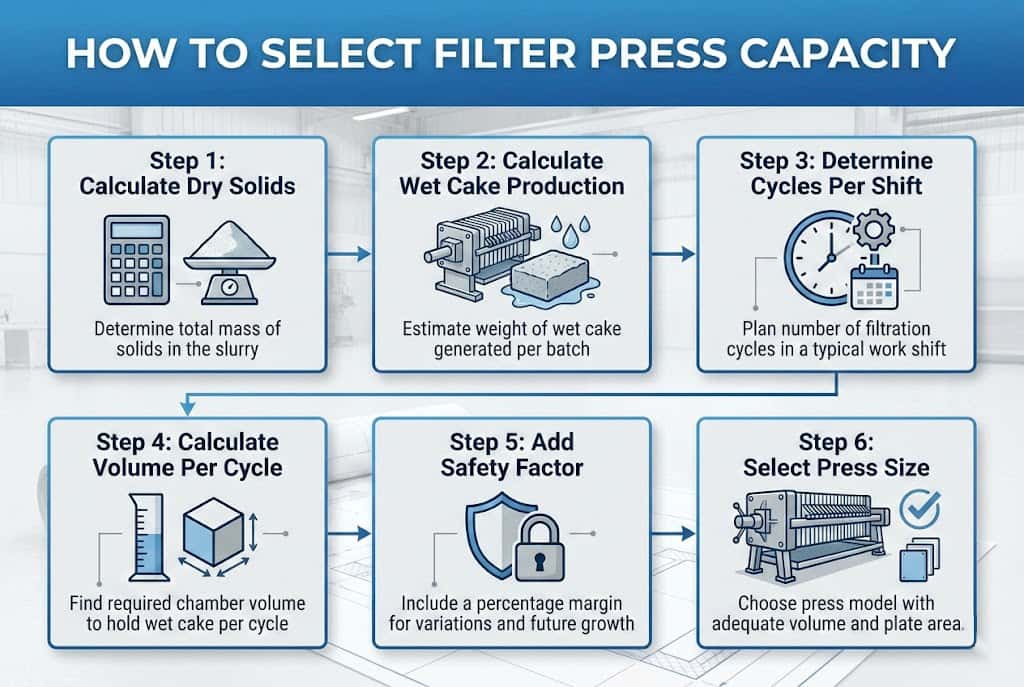
Step 1: Calculate Dry Solids
First, convert gallons to weight (assuming 8.34 lbs/gallon):
1,800 gallons × 8.34 = 15,012 lbs total sludge
Dry solids = 15,012 × 8% = 1,201 lbs per day
Step 2: Calculate Wet Cake Production
With 75% moisture content, the cake is 25% solids.
Wet cake = 1,201 lbs dry ÷ 25% = 4,804 lbs per day
Step 3: Determine Cycles Per Shift
With 8-hour operation and 2.5-hour cycles:
8 hours ÷ 2.5 hours = 3.2 cycles (round down to 3)
Step 4: Calculate Volume Per Cycle
4,804 lbs per day ÷ 3 cycles = 1,601 lbs per cycle
Convert to volume (assuming 75 lb/ft³ cake density):
1,601 lbs ÷ 75 lb/ft³ = 21.3 ft³ per cycle
Step 5: Add Safety Factor
21.3 ft³ × 1.2 safety factor = 25.6 ft³ required capacity
Step 6: Select Press Size
Based on this calculation, you’d need either:
- 800mm press with ~48 plates
- 1000mm press with ~30 plates
(The choice depends on your footprint, budget, and expansion plans.)
Common Mistakes That Kill Filter Press Performance
I’ve seen these mistakes dozens of times. Don’t let them happen to you.
Mistake #1: Ignoring Slurry Variability
Your process changes. Upstream conditions fluctuate. Seasons affect biological activity.
If you size for one specific condition, you’re setting yourself up for failure.
The fix: Test your slurry under different conditions. Size for the worst case.
Mistake #2: Focusing Only on Purchase Price
A smaller press costs less upfront. Obviously.
But if it runs 24/7 just to keep up, your operating costs explode.
The fix: Calculate total cost of ownership over 10 years. Include labor, maintenance, and downtime.
Mistake #3: Skipping Pilot Testing
Theoretical calculations are great. But nothing beats real-world data.
The fix: Run pilot tests with your actual slurry. Many vendors offer rental units for testing.
Mistake #4: Forgetting About Cake Handling
I’ve seen perfectly sized presses fail because nobody thought about what happens to the cake.
Too wet? Your conveyors can’t handle it.
Too dry? It might not discharge properly.
The fix: Define your cake handling requirements first. Then size the press to meet them.
Advanced Considerations for Optimal Sizing
Once you’ve got the basics down, these factors can fine-tune your selection:
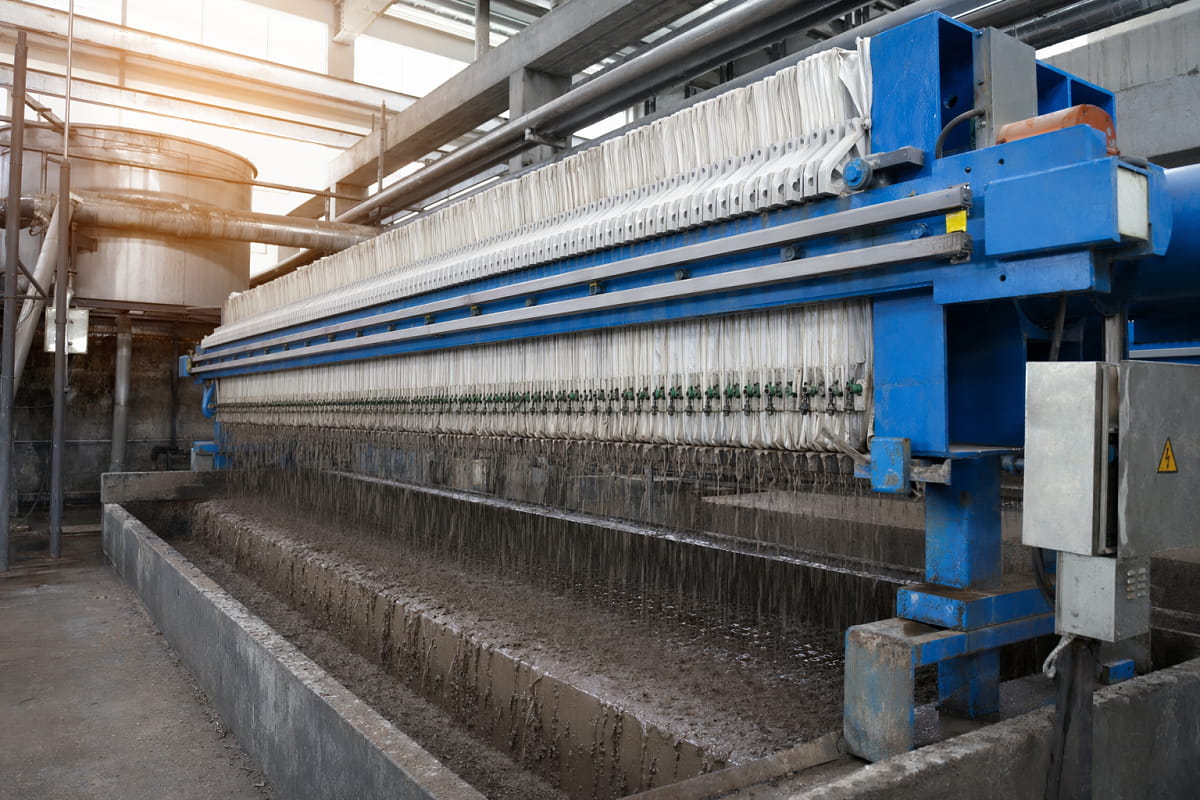
Membrane vs. Recessed Plates
Membrane plates can squeeze out an extra 5-10% moisture. But they add cycle time and complexity.
Worth it for:
- High disposal costs
- Thermal drying downstream
- Long-distance transport
Skip them for:
- Simple landfill disposal
- Materials that don’t compress well
- Budget-conscious operations
Automation Level
Full automation can cut cycle times by 30-40%. That effectively increases your capacity without a bigger press.
Consider automation if:
- Labor costs are high
- You run multiple shifts
- Consistency is critical
Feed Pump Selection
Your feed system determines fill rates and final pressure.
Options:
- Centrifugal pumps: Lower pressure, higher flow. Good for easy-filtering materials.
- Positive displacement: Higher pressure, precise control. Better for difficult sludges.
- Combination systems: Start with centrifugal pumps, finish with positive displacement.
Real-World Capacity Examples
Let me share some typical sizing scenarios I’ve seen work well:
Municipal Wastewater (1 MGD plant, 1.5% feed solids):
- 630mm press, 60 plates
- 3-hour cycles
- Processes 20 tons/day dry solids
Mining Tailings (copper concentrate):
- 1500mm press, 125 plates
- 45-minute cycles
- Handles 200 tons/day dry solids
Food Processing (dairy waste):
- 800mm press, 40 membrane plates
- 2-hour cycles
- Manages 8 tons/day with 65% cake solids
Notice how different industries need completely different configurations? That’s why cookie-cutter sizing never works.
Your Next Steps
Here’s what to do right now:
- Gather your data: Daily volumes, solids content, operating constraints
- Run the basic calculation: Use the method I showed above
- Identify your variables: What changes seasonally? What might increase?
- Get samples tested: Either in-house or through a vendor lab
- Request pilot testing: Verify your calculations with real equipment
Remember:
The time you spend on proper sizing pays off for years. Rush the process, and you’ll pay for it every single day of operation.
The Bottom Line
Learning how to select filter press capacity doesn’t have to be complicated.
Focus on your actual solids loading. Understand your slurry characteristics. Plan for realistic operating conditions. And always, always include a safety factor.
Get these fundamentals right, and you’ll have a filter press that runs efficiently for decades.
Skip them, and you’ll join the 67% of facilities struggling with undersized or oversized equipment.
The choice is yours.
But now you’ve got the knowledge to make the right one.